Sacs personnalisés pour dire merci…

DSC_4154_Fotor

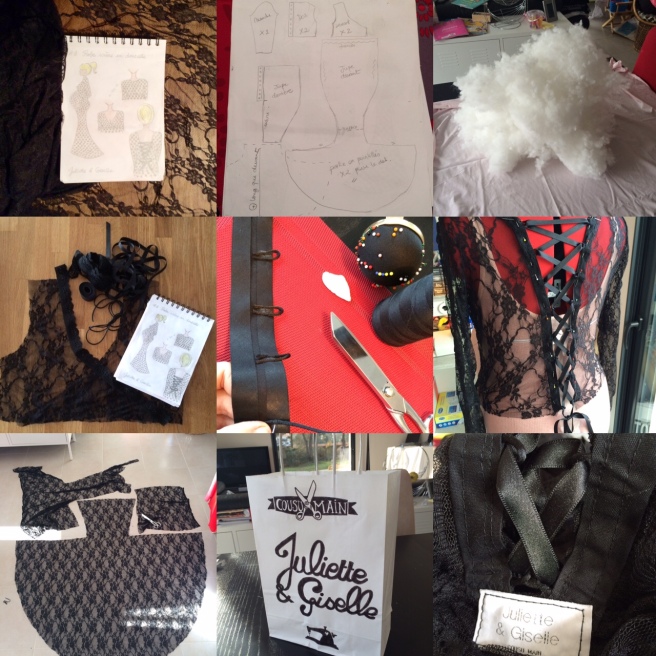
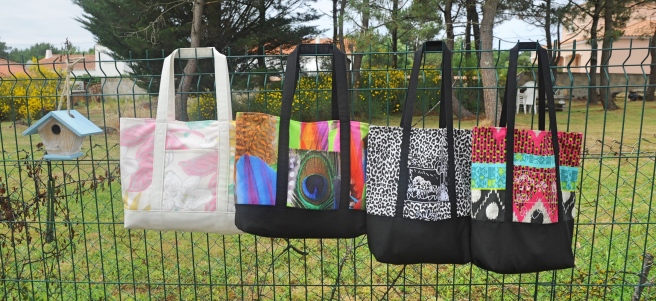
Cette année pour nous c’est la fin de deux années avec la même maîtresse et la même ATSEM pour la grande et également deux années avec ma nounou et sa collègue assistante maternelle dans leur super MAM pour la petite. J’ai cherché quelle genre de petite couture maison pourrait convenir à tout le monde et le tote bag / sac de plage s’est vite imposé par sa simplicité, le côté utile, la possibilité de jouer avec les matières et la personnalisation (discrète) pour marquer le coup!

This year we have to say goodbye to the same teacher & assistant my eldest has known for the past two years & also to my youngest’ amazing nanny & her colleague after also two years in their great MAM (house of nannies). I thought of what could I sew to please everyone and the tote bag / beach bag imposed itself because it’s simple, useful, you can play with fabrics & you can customize it (in a discreet way) for the occasion!

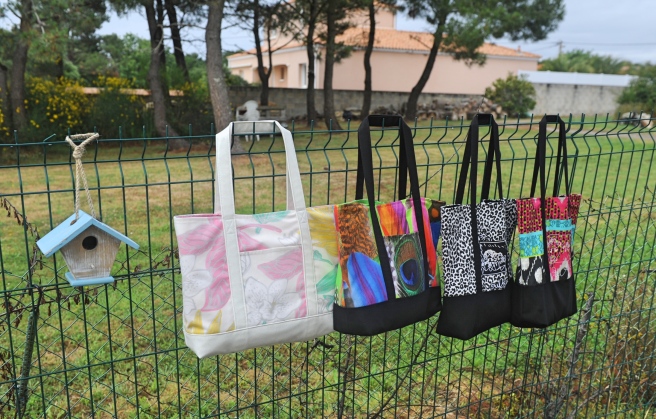
J’ai cherché sur le net un tuto et le premier trouvé était le bon: celui de « The Inspired Wren ». Je l’ai choisi pour deux raisons: le style avec les anses insérées dans le fond fixant au passage la poche extérieure et surtout parce qu’il était doublé! J’ai agrandi les dimensions car le sac initial était un peu petit à mon gout. Pour la maîtresse et son assistante j’ai gardé le format tote bag et j’ai ajouté une petite trousse réalisée à partir du tuto de « Au gré du vent ». J’ai utilisé pour la maîtresse les chutes de sergé de coton léopard de ma « salopette turia » de chez The Sweet Mercerie et pour son assistante les chutes de ma future veste « aime comme maraude » en tissu d’ameublement ethnique trouvé aux Tissus du Renard.

I looked on the internet for some tutorial and the first one I found was the one: the tote bag tutorial of « The Inspired Wren ». I chose it for two reasons: The style of the bag with the handles inserted in the bottom fixing the outer pocket on the way and because it was lined! I made it bigger than the original which I found too small. For the teacher & her assistant I kept the tote bag format and I added a little zipped pouch made from the « Au gré du vent » tutorial. For the teacher I used the scraps of the leopard fabric I made my « turia overalls » with and for her assistant the scraps of my future « Aime comme Maraude » in ethnic furniture fabric I found at Les Tissus du Renard.

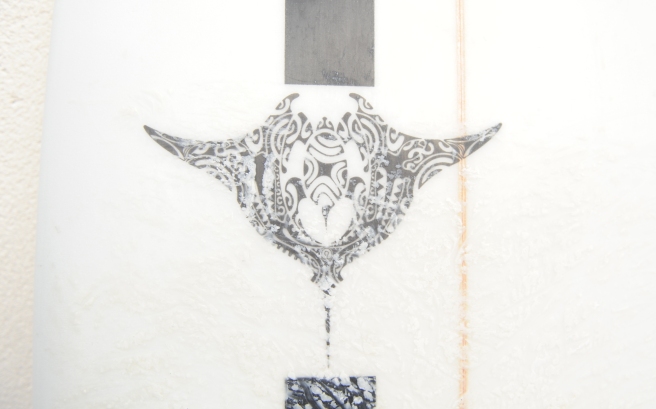
Pour la personnalisation j’ai scanné les dessins faits par ma fille que ma Silhouette Portrait a ensuite vectorisé puis elle a découpé mes feuilles de flex selon le dessin pour pouvoir personnaliser les poches extérieures des sacs ainsi qu’un petit « Merci …. » thermocollé sur la doublure. J’ai utilisé du flex pailleté blanc sur le tissu ethnique et du flex floqué blanc sur le tissu léopard. J’ai du recolorier au feutre noir spécial textile autour du dessin sur le léopard pour qu’on le voit!

DSC_4144_Fotor

For the customization I scanned little drawings made by my daughter which were then vectorized by my Silhouette Portrait & then she cut the flex sheets according to the drawing to customize the outer pockets of the bags & a little « thank you… » phrase heat pressed on the lining. I used white glitter flex on the ethnic fabric & white flock flex on the leopard fabric. I had to color the « inside » of the drawing on the leopard bag with a textile black marker so it would show!

DSC_4175_Fotor

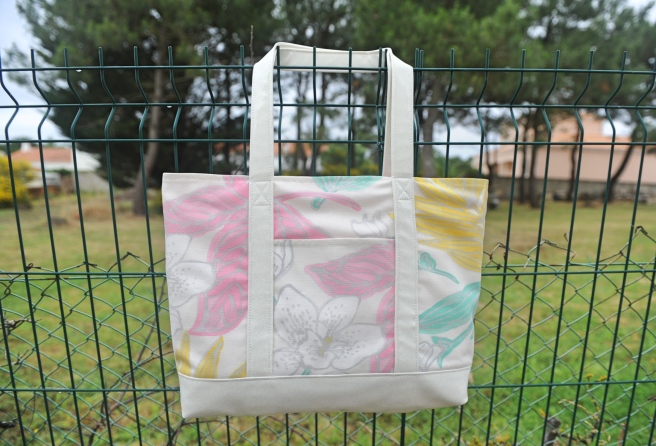
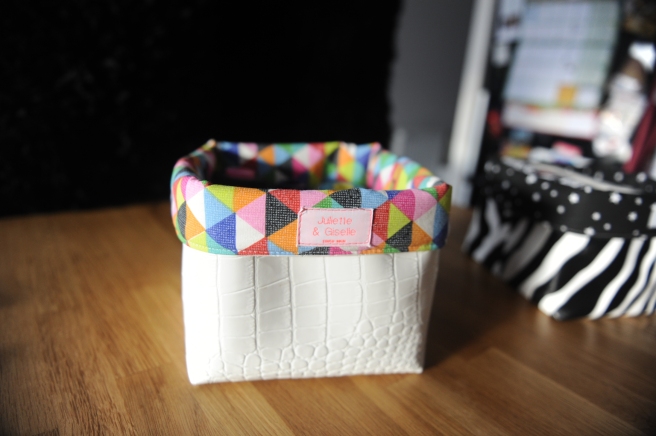
Pour les nounous j’ai changé la forme du patron pour obtenir un sac plus « cabas » parfait pour la plage cet été! Ma fille de 3 ans voulait absolument du rose pour sa nounou et du vert pour sa collègue. J’aimais beaucoup le fait d’utiliser un tissu imprimé pour contraster avec le fond et les anses. J’ai réellement flashé sur cet imprimé pastel floral trouvé aux Tissus du Renard mais ça n’allait pas avec du noir. J’avais en stock ce simili pailleté blanc cassé mais j’avoue avoir eu très peur des épaisseurs notamment pour les anses qui sont repliées deux fois sur elle-mêmes donc 4 épaisseurs… et puis avec mon bout de scotch sous le pied c’est passé tout seul 😉

DSC_4177_Fotor

For the nannies I decided to changed slightly the shape of the bag to obtain more of a beach bag, perfect for this summer! My 3 year old clearly asked a pink bag for her nanny & a green one for her colleague. I like the combination of a printed fabric & a plain one to create some nice contrast with the bottom and the handles. I really loved this printed pastel floral fabric when I saw it at Les Tissus du Renard but it wouldn’t match with black… I had in stock this lovely glittery PVC white farbic but I was at first kinda of scared especially because the handles would require four layers to stitch together… but then with my little tape piece under the presser foot it ran like clockwork 😉

DSC_4181_Fotor

Pour compléter le sac j’ai réalisé une superbe petite pochette zippée en suivant le tuto d’Hélène du blog « Pour mes jolis mômes, mais pas que… » sur le blog des Editions de Saxe. J’ai utilisé les mêmes tissus + une feuille de flex pailleté argenté & un zip rose.

To complete the bag I made a lovely zipped pouch following the great tutorial of Hélène of the « Pour mes jolis mômes, mais pas que… » blog on the « Editions de Saxe » blog. I used the same fabrics + some silver glitter flex and a pink zipper.

DSC_4169_Fotor

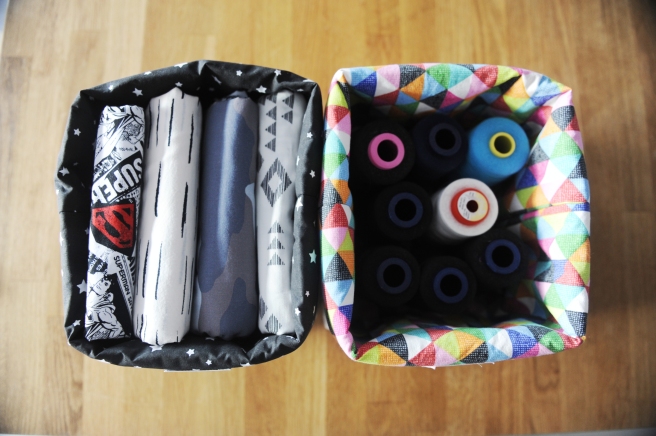
Pour le deuxième cabas j’ai utilisé un super tissu à motifs plumes dans des couleurs fluos trouvé encore et toujours aux tissus du renard. Comme pour les premiers sacs j’ai contrasté avec du tissu épais noir. Pour les deux cabas j’ai rajouté une poche zippée dans la doublure en suivant le super tuto de Sacôtin. Personnalisation toujours au flex, pailleté pour les deux. Et voilà pour les jolis cadeaux bien mérités pour ces superwomen qui s’occupent si bien de nos enfants! A la rentrée c’est CP pour la grande et petite section pour la petite, une page se tourne!

For the second beach bag I used a wonderful fabric with printed neon colours again found at Les Tissus du Renard. Like the first tote bags I contrasted with black thick canvas. For both beach bags I added a zipped pocket in the lining following the great tutorial of Sacôtin. Customization again with flex, glitters for both! And there you go, lovely and well deserved little gifts for those superwomen taking care so well of our kids! In September my eldest starts Primary School and the little one kindergarten, a new chapter begins!

Robe « Rouge Ruby » & Tutu blanc pour shootings maternité avec Eternity Photography!

Après la robe « Noir c’est Noir », ma première création originale pour Eternity Photography, voici la seconde, la robe « Rouge Ruby »! Après la dentelle noire, place à la mousseline rouge! Woohoo! (l’enfer…) Après une robe « sirène » ajustée voici une robe vaporeuse pleine de légèreté. Entre temps Aurélie m’a également demandé un tutu blanc pour varier les looks et surtout pour mettre en valeur cette fois ci le ventre nu et très rond des futures mamans. J’ai improvisé ces deux modèles sans patrons mais vous verrez que malgré la difficulté de la matière pour la robe en mousseline, la création du modèle a été, elle, assez simple, quand au tutu il ne nécessite même pas de machine à coudre! Facile…

After the « Noir c’est Noir » dress, my first original creation for Eternity Photography, here is my second one, the « Ruby Red » dress! After black lace, let’s hear it for red chiffon! Woohoo! (Hell…) After a tight mermaid dress here is a flimsy & light gown. In the meantime, Aurélie also asked me for a white tutu to vary the looks and to have a garment that highlights the bare big belly of those mamas to be! I improvised both garments patternless, but you will see that in spite of a very hard fabric to work with (that is the chiffon), the model itself was quite easy to build and put together. As for the tutu, you don’t even need a sewing machine! Easy peasy…

Comme pour la première, la difficulté principale a été de faire une robe qui aille à la majorité des femmes enceintes dans leur dernier trimestre. Ici j’ai donc fait un bandeau large doublé que j’ai resserré entre les seins avec un empiècement cousu en cercle. La jupe est un rectangle froncé et élastiqué sur le haut que j’ai attaché au bandeau en prenant soin d’y insérer deux rectangles afin de créer ces deux pans qui génèrent du volume et font leur petit effet lorsqu’il y a du vent! Tous les ourlets sont roulottés à la machine (impossible à la surjeteuse!). Enfin j’ai inséré 3 fois 2 liens pour fermer la robe dans le dos, comme ça la robe s’adapte aux différentes morphologies et aux différents tours de poitrine! Enfin j’ai cousu deux bandes « anti-glisse » sur l’envers du bustier au dessus des seins pour que tout tienne en place! La mousseline rouge vient de chez etissus.com. Et voilà pour la robe « Ruby »! Je suis contente car je suis très proche de mon premier croquis 🙂

As for the first dress, the main difficulty was to make a dress that fitted most pregnant women in their third trimester. I started by making a wide sleeveless bodice which I lined and narrowed between the breasts with a circled piece of fabric. The skirt is a big rectangle gathered at the top to which I added a piece of elastic and which I attached to the bodice, inserting 2 rectangles to create volume and a nice effect if it gets windy outside! All hems are rolled with my regular sewing machine (impossible to do with my serger). Then I inserted 3 x 2 ties to close the dress in the back, so it adapts to all bodies and chest sizes! Finally, I sewed two « anti-sliding » strips on the inside of the bodice just above the breasts so everything stays in place! The red chiffon is from etissus.com. And that’s it for the « Ruby » dress! I am very happy because I am very close to my original sketch 🙂

Pour le tutu j’ai utilisé la technique du « no sew » soit le tutu sans couture. La technique est ultra simple et consiste à nouer des bandes de tulle autour d’un ruban qu’on viendra nouer autour de la taille pour fermer le tutu une fois fini. Personnellement j’ai commandé mon tulle souple (j’insiste!) aux Coupons de Saint Pierre et il m’en a fallu 10m! (Alors que la laize est de presque 3m!). J’ai coupé des bandes d’environ 8cm x deux fois la hauteur de la jupe. Je vous laisse visionner la vidéo de la technique du noeud sur mon compte instagram: @juliette_et_giselle. Comme il me restait un peu de tulle et de ruban, j’ai improvisé un « cache soutien-gorge » qui complète le look. Je n’ai pas mis mon faux bidon sur les photos et au final cette tenue va aussi bien à celles qui ne sont pas enceintes!

For the tutu I followed the « no sew » technique, meaning the stitchless way to make a tutu. The technique is very simple, you just tie strips of tulle around a ribbon which you will tie in the back when you’re done to attach the tutu around the waist. I order my soft tulle (I insist!) on Coupons de Saint Pierre and I need 10m! (for an almost 3m width!) I cut strips of around 8cm wide on twice the required skirt length. Please check the little video on my instagram which show the tying technique: @juliette_et_giselle. As I had some tulle & ribbon left, I improvised a « bra cover » which completes the look. I did not wear my fake belly for the shoot as this outfit looks also great on non pregnant women!

DSC_3729

Et voilà! J’ai déjà pu voir les premiers clichés d’Aurélie d’une magnifique future maman dans ces deux nouvelles tenues et c’est superbe! Je vous invite à aller découvrir son travail sur son site internet ou en la suivant sur Instagram: @eternityphotography78

There you go! I was luck enough to see Aurélie’s first shots of a beautiful mama to be in those two outfits and it’s amazing! Don’t hesitate to go and discover her work on her website of by following her on Instagram: @eternityphotography78 

Crédit photo: Stan D.

Welcome Baby Iris!

DSC_3364

Il y a un mois tout juste une mini-miss a pointé son petit bout de nez et elle répond au doux nom de Iris… So cute! Iris c’est surtout la fille, et premier bébé, du meilleur ami de mon mari, donc c’est comme sa nièce! Alors c’est avec un immense plaisir que je me suis lancée dans ce « pack » naissance composé d’une couverture, d’une cape de bain, d’un doudou musical & d’une barboteuse (la chose la plus mignonne que j’ai jamais cousue)! Pour réaliser tout cela j’ai utilisé le sublime Batiste Tana Lawn de Liberty of London: le Adelajda rose, un tissu doudou Minkee blanc/écru embossé d’étoiles, une éponge blanche, un molleton fushia, biais & passepoil lurex doré et du flex pailleté or.

Just one month ago an adorable mini miss arrived into this world and she goes by the sweet name of Iris… So cute! Iris is the daughter, and first child, of my husband’s best friend, so she’s like his niece! Therefore it was with joy & excitement that I created this birth « package » just for her: a blanket, a bath cape, a musical guitar & a dress/romper (probably the cutest thing I have ever sewn)! To make all this I used the gorgeous Tana Lawn fabric from Liberty of London: The Adelajda cotton in pink, some star embossed white minkee, white Terry Cloth, fushia sweatshirt fleece, lurex gold bias tape & piping & glittering gold flex.

DSC_3308

J’ai commencé par le doudou guitare car je n’avais pas besoin de connaitre le prénom pour le faire 😉 Pourquoi une guitare? Parce que le papa est guitariste bien sur 🙂 Je me suis inspirée de plusieurs tutos, notamment celui de Mzelle Bulle ici. J’ai rétréci le manche et un peu improvisé au fur et à mesure! J’y ai surtout inséré un boitier musical chez Lutèce Créations (ils ont un choix immense!) et la mélodie que j’ai choisie est… La Guerre des Etoiles! Trop cool, J’a-dore! Si vous voulez voir la guitare en action, checkez mon compte Instagram (@juliette_et_giselle) car WordPress ne permet pas d’uploader des videos à moins de prendre l’abonnement annuel à 99€… Pas cool. Pas de difficulté particulière mais au final le manche n’est pas très droit… C’est ce qui fait son charme!

I started with the guitar because I didn’t need to know the baby’s name to do it 😉 Why a guitar? Beacause the dad is a guitar player duh! I used different tutorials especially the one of Mzelle Bulle here. I shortened the neck and improvised as I was going! My main customization is that I inserted a musical box in it, bought at Lutèce Creations (they have so many different tunes!) and the melody I chose is… Star Wars! So cool… I looooove it! Check my Instagram account (@juliette_et_giselle) to see the guitar in action as WordPress doesn’t allow video upload unless you take the 99€ a year subscription… Not cool. It was quite an easy project the only thing I’m not satisfied with is that the neck is not straight, but that’s what makes it cute… right?!

Ensuite j’ai fait une jolie couverture, c’est mon cadeau de naissance préféré! J’ai déjà fait deux articles dessus: ici & ici! J’adore… c’est douillet, c’est confortable, c’est intemporel & ça peut être utilisé par papa ou maman en cas de pénurie de plaid sur le canapé… Je me répète mais ce Liberty Adelajda c’est juste une merveille… J’ai entoilé le doudou/minkee pour l’empêcher de s’étirer au fur et à mesure de la couture (il est un peu stretch), j’ai inséré un passepoil en lurex doré tout autour et il y a une couche de ouatine entre les deux tissus pour plus de moelleux 😉 J’ai entoilé un petit bout de doudou/minkee pour pouvoir découper le prénom avec ma Silhouette Portrait que j’ai ensuite brodé avec un fil contrastant doré. J’adore l’association de couleurs blanc/doré/rose!

DSC_3356

Then I made baby a little blanket, this is my favorite birth gift ever! I already posted twice about it: Here & here! I just love it… It’s soft, it’s comfy, it’s timeless and it can be useful to mom & dad if they can’t find any plaid to hang on the sofa… I am repeating myself but this Liberty Adelajda is just beautiful… I interfaced the minkee to prevent it from stretching as I sewed on. I inserted some gold lurex piping all around the blanket and a layer of wadding between the two layers of fabric for more softness 😉 Then I interface a small bit of minkee in which I cut the name with my Silhouette Portrait and I embroidered it with a contrasting gold thread. I just love this combination of colours: white/gold/pink!

J’ai continué mon trousseau avec une cape de bain blanche bordée de biais en lurex doré (posé avec mon super pied pose biais universel!!! Clin d’oeil à mes followers IG!). Comme je l’ai faite assez grande pour qu’elle lui fasse longtemps j’ai rajouté quelques étoiles en appliqué au centre pour habiller ce grand carré blanc. Et bien sur, sur le « chapeau », le prénom de la miss & un joli coeur dans mon super Liberty 🙂 J’ai également brodé cet appliqué avec un fil contrasté doré pour faire ressortir le Liberty.

DSC_3323

I then made a bath cape in white Terry Cloth with golden lurex bias tape all around it. (sewn with my amazing foot!!!! Nod to my IG followers!). As I made it quite big so its lasts a couple of years, I added some star shapped appliqués in the center to decorate a little this big white square! And of course I put the lovely name on the « head » part together with a sweet heart in my amazing Liberty 🙂 I also embroidered around the appliqués with a contrasting gold thread to bring out the gorgeous pattern of the Liberty.

DSC_3327

Et enfin, vu qu’il me restait de ce sublime Liberty, j’avais décidé de coudre un petit vêtement estival à la Miss. Vu que le tissu n’est pas extensible j’ai tout de suite imaginé une petite tunique ou barboteuse. J’ai cherché… j’ai cherché… donc oui il y a des livres canons du style « Intemporels pour bébé » (j’ai les deux exemplaires de la version enfant) mais j’avais une idée précise en tête: des bretelles pour que bébé soit à l’aise avec ses bras, une jupette, et surtout pas d’élastique en milieu de cuisse qui serre mais plutôt une culotte cache-couche format maillot de bain. Et enfin, miracle! J’ai trouvé ce sublime patron de Felicity Sewing Patterns: La barboteuse « Tinkerbelle »! Bravo à Stephanie pour la qualité et la clareté de ses pdfs (patron & explications). Le patron va de 3 mois à 3 ans donc je vais pouvoir en faire un version robe pour ma petite et même pour ma grande car j’adore le dos!

As I had some of this amazing Liberty left I decided to go for a sweet summer outfit for the little lady. As the fabric is not stretchy I imagined a little top or romper. I searched… and I searched… Ok there were great classic patterns in books such as « Intemporels pour bébés » (I own the 2 versions for the kids) but I had a precise idea in my mind: Straps so the baby girl could move her arms freely, a skirt, and no « around the thigh » elastics but more a bikini shaped « diaper hider ». And then, a miracle!I found Felicity Sewing Patterns gorgeous « Tinkerbelle » romper pattern! Congratulations to Stephanie for the quality and simplicity of her pdf’s (pattern & sewalong). The pattern’s sizes go from 3 months to 3 years old so I might make dress versions for my youngest and probably for my eldest as well because I just love the back!

DSC_3325

Et voilà! J’adore coudre pour les bébés! C’est toujours adorable 😉 Et n’oubliez pas de checker mon compte Instagram (@juliette_et_giselle) pour voir la vidéo de la guitare en action! Encore félicitations aux heureux parents!

And voila! I just love sewing for babies! It’s always so cute 😉 And don’t forget to check my Instagram account  (@juliette_et_giselle) to see the video of the guitar in action! Again, congratulations to the happy parents!


Duo Mère/Fille: « Aime comme Macaroni » & « Owl Princess » roses poudrés…

DSC_3271

Ce superbe jersey flammé rose poudré & écru déniché par hasard aux Tissus du Renard m’a inspiré ce duo Mère/Fille pour ma copine et sa fille, copine de ma fille (vous me suivez? Hi hi hi…). Je suis tout de suite partie sur mon nouveau patron fétiche, le très original « Aime comme Macaroni » pour la maman. C’est en fait mon second Macaroni, le premier n’a pas encore trouvé le temps de se faire shooter! Ce modèle & le jersey sont faits l’un pour l’autre… Pour la miss j’ai fait aussi un de mes chouchous chez Ottobre Design, le Owl Princess, petite tunique girly toute simple. Ce modèle fait partie du numéro Printemps 1/2014 toujours en vente chez Mamzelle Fourmi (entre autres).

This gorgeous pale pink & ecru slub jersey found randomly at Les Tissus du Renard inspired me this Mother/Daughter duet for my friend & her daughter, friend of my daughter (you follow? Hi hi hi…). I instantly went for my new fav pattern, the very original « Aime comme Macaroni » for the Mama. It is actually my second Macaroni, the first one hasn’t found the time to be shot! This pattern & this fabric were meant to be together… For the little Miss I chose to make also one of my favorites from Ottobre Design, the lovely & simple yet girly « Owl Princess ». This model is from the Spring 1/2014 issue still available at Mamzelle Fourmi (among others)

J’ai tout cousu à la surjeteuse: coutures & ourlet roulotté. J’ai découvert cette finition qui se prête à merveille aux volants sur les réalisations IG de l’autre modèle d’Aime comme Marie sur lequel j’ai flashé: « Aime comme Magellan ». Modèle aussi cousu mais toujours en attente d’être shooté! Je suis moins fan du col roulotté « gondolé » mais j’ai lâché l’affaire du col monté avec mon jersey hyper fin et très élastique… Rien à dire sur le patron, c’était mon premier « Aime comme Marie » et je n’ai pas été déçue du tout: super packaging, livret & explications clairs, montage simplissime, modèle casual mais original & girly, bref top!

I used my serger only for all seams and the rolled edges. I discovered this particular hem style, perfect for ruffles, watching the IG posts of « Aime comme Marie » other gorgeous pattern: « Aime comme Magellan », which I also did but not shot yet… I am not convinced about how I finished the collar but I gave up sewing a collar in my thin and very stretchy fabric… I loved the pattern, my very first « Aime comme Marie » and it did not disappoint! Great packaging, clear booklet and sewalong, easy building of the garment, casual & simple yet girly model, just great! 

Pour la personnalisation du top je me suis largement inspirée du célèbre sweat « Maman Cool » de la marque Emoi Emoi. Pour le modèle enfant c’est mon mari qui m’a dit que nos filles n’arrêtaient pas de dire « trop cool » du coup c’est devenu « Fille (trop) Cool » pour aller avec celui de Maman. J’ai rajouté dans le dos le prénom et un orque (parce que le « it truc » du moment dans la cour c’est d’avoir un animal sur tes fringues et je sais qu’elle a adoré « Sauvez Willy »). J’ai utilisé du flex thermocollant effet velours acheté chez Créadhésif que j’ai découpé avec ma Silhouette Portrait. En ce qui concerne les polices d’écriture si vous voulez utiliser les mêmes, j’ai utilisé la police « Cursive Standard » pour les phrases des devants & « Sablon Up College » pour le prénom dans le dos, toutes deux trouvées sur dafont.com. Et voilà un petit duo mère/fille tout mignon pour leur anniversaire commun du 1er avril!

DSC_3291

For the customization I was largely inspired by Emoi Emoi’s famous « Maman Cool » Sweatshirt. For the kid version, my husband helped a little by telling me the girls always say that things are « trop cool » (so cool!) so there it was: « Fille (trop) Cool » to match Mommy’s tee. I added the firstname in the back and an orca because the « it thing » right now in the playground is to have an animal on your clothes! (And she loved Free Willy so..). I used press on white flex with a flock effect bought at Créadhésif cut with my Silhouette Portrait. Regarding the fonts, if you are interested in getting them, I used « Cursive Standard » for the front messages & « Sablon Up College » for the firstname, both found on dafont.com. And ta daaa! There you have a cute Mother/Daughter duet for their April 1st shared birthday!


Bienvenido a Romeo!

DSC_2803

Romeo c’est le premier bébé que je gâte en 2016 alors j’ai mis le paquet! D’abord parce que les cadeaux de naissance c’est parmi ce que je préfère coudre (les bébés c’est ma corde sensible!), ensuite parce que grâce à sa maman, qui m’a présenté Aurélie d’Eternity Photography, que je me suis lancée dans les robes de maternité pour shootings canons et parce qu’à chaque fois je me lance un petit « défi nouveauté » comme ici les chaussons & le bandeau pour Maman! La particularité c’est que cette fois ci je ne savais pas le sexe à l’avance j’ai donc choisi mon liberty en fonction des couleurs de la chambre du futur bébé et surtout j’ai opté pour un sublime motif qui va aussi bien à un garçon qu’à une fille. And it’s a boy! Et avec un prénom pareil je fonds…

DSC_2817

Romeo is the first baby I get to spoil in 2016 so I went full throttle! First because birth gifts are one of my favorite things to sew (babies are my weakness!), secondly because thanks to his mom, who introduced me to Aurélie from Eternity Photography, I got to sew gorgeous maternity gowns for amazing photoshoots and finally because it makes me challenge myself with « never sewn before » stuff such as in this case little sleepers & a headband for Mommy! The thing is I didn’t know the sex of the baby until he was born so I had to choose a Liberty according to the baby’s room colors & also a gorgeous pattern that would fit perfectly either a boy or a girl. And it’s a boy! And with such a firstname I am melting already…

DSC_2828

Pour les tissus j’ai donc opté pour ce sublime Liberty of London motif Eben de Tana Lawn trouvé chez La Jolie Mercerie sur A Little Mercerie. Ce qui est fou avec les couleurs de ce tissu c’est que les photos du site où je l’ai acheté sont complètement différentes que celles que j’ai prises. Comme quoi quand on joue avec les couleurs et les associations on peut avoir des résultats différents mais tout aussi beaux. Moi j’ai opté pour des couleurs un peu plus froides en associant mon liberty avec un tissus doudou blanc embossé d’étoiles (Tissus du Renard) et un passepoil en lurex argenté (Jardin des Opalines, A Little Mercerie). Pour la personnalisation j’ai utilisé du flex pailleté argenté que j’ai découpé avec ma Silhouette Portrait.

DSC_2806

For the fabrics I chose this gorgeous Liberty of London from Tana Lawn called Eben, found at La Jolie Mercerie on A Little Mercerie. What is amazing with the colours of this pattern is that the pictures on the seller’s website are completely different from mine. Which means that with this fabric you can play a lot with colours and with all the different associations possible and get different yet beautiful results. I chose colder colors with a white minkee fleece embossed with stars (Tissus du Renard) and silver lurex piping (Jardin des Opalines, A Little Mercerie). For the customization I used glittery silver flex cut with my Silhouette Portrait. 

DSC_2837

La bonne nouvelle est que les tutoriels et patrons que j’ai utilisés ici sont tous gratuits! Woohoo! Pour la couverture rien de plus simple, j’ai coupé 2 rectangles d’un mètre par 70cm, un dans le liberty & un dans le doudou. J’ai posé le passepoil sur le liberty puis j’y ai cousu le doudou en prenant soin de laisser une ouverture pour insérer le même rectangle de molleton puis j’ai fini de coudre au point invisible et enfin j’ai cousu une surpiqûre pour maintenir les 3 couches ensemble. Pour les chaussons j’ai utilisé ce tuto et pour une première je suis assez satisfaite ils sont adorables en liberty doublés doudou. Pour le bonnet aux oreilles d’ourson j’ai utilisé ce tuto & enfin pour le headband j’ai trouvé mon bonheur sur le blog de Bee Made!

DSC_2823

Good news here: all patterns & tutorials I used are free! Woohoo! For the blanket there’s nothing easier: two rectangles of 1m x 70cm, one in the Liberty, one in the Minkee. I sew the piping on the Liberty then the Minkee leaving a little opening to insert a third rectangle of wadding. I closed the opening with an invisible stitch. I finished by topstitching all around to maintain the 3 layers in place. For the little slippers I used this tutorial and for a first I think they look super cute with this gorgeous Liberty and minkee lining! For the little bear hat I found this great tutorial, and finally everything to make this cool headband was on Bee Made’s blog!

DSC_2832

Et voilà! J’espère que tout cela va plaire à Romeo et à ses parents! Comme je l’ai déjà dit dans un précédent article, mes filles ont toujours les couvertures qu’elles ont reçues à leur naissance et qu’elles vont encore garder longtemps, j’espère à chaque fois que ce sera pareil pour les enfants à qui je les offre! Bienvenue Romeo!

Ta daaa! I hope Romeo & his parents will like it all! As I already said in a previous post, my daughters still have & use their birth blankets and will keep them forever I think, I always hope it will be the same for the babies I offer my blankets to! Welcome Romeo!

DSC_2807


Robe « Noir c’est Noir » ou ma première création originale…

DSC_2622

Il y a quelques semaines j’ai reçu un message d’une super photographe spécialisée dans les femmes enceintes & les nouveaux-nés, Aurélie d’Eternity Photography, me demandant si cela m’intéressait d’embarquer dans un projet dingue: créer des robes pour ses shootings. Sans la moindre (même infime) hésitation j’ai répondu: BANCO! Après j’ai jeté un oeil sur Pinterest et j’ai vu que ces sublimes robes étaient en majorité faites en dentelle & en mousseline. Et là je me suis dis: « Bah oui facile la dentelle! Fingers in the nose… » bon je vais quand même bosser le dossier et faire mes devoirs avec Google… Aurélie m’avait donné deux styles de robe à développer: Une robe sirène près du corps & une robe rouge avec beaucoup de voilage. Vous découvrez donc ici la première et la seconde est en cours de conception dans mon cerveau! ha ha! 😉

A few weeks ago I was contacted by a wonderful photographer specialized in pregnant women & newborns, Aurélie from Eternity Photography, asking me if I was interested to create gowns for her photo shoots. With no hesitation at all I said YES! And then I looked for those gowns on Pinterest and I saw that most of them are made of lace or chiffon and I told myself: « Lace? Easy-peasy! Fingers in the nose… » To make sure I will not ruin my fabric right away I started to work my case with a little help from my friend Google… Aurélie had given me two style of gowns she wanted me to develop: A tight mermaid gown & a red gown with lots of fabric « flowing » behind. You are seeing the first one here and the second is a work in progress in my brain right now! Ha ha! 😉

Avant toute chose j’ai commencé par me confectionner un faux ventre en nouant un coupon de jersey rose que j’ai rempli de rembourrage à doudou. J’ai ensuite installé le tout sur mon mannequin. Le tissu est une dentelle stretch noire trouvée sur etissus.com. J’ai également acheté la mousseline rouge de ma prochaine robe sur ce site. Je tiens à souligner l’excellent SAV de ce site qui accepte les retours et qui m’a relivrée suite à une erreur de couleur en un rien de temps et ce pendant les fêtes de fin d’année! Chapeau! Pour les finitions de l’encolure croisée, du corset, des poignets, et de la ceinture sous poitrine, j’ai mis un ruban en dentelle stretch trouvé chez mon marchand de tissu local, Les Tissus du Renard, chez qui j’ai également trouvé le ruban en satin du laçage dans le dos, un biais & une cordelette noirs qui ont servi à la réalisation du corset.

DSC_2614

First things first, I started by making a fake belly with a knotted piece of jersey which I stuffed with some teddy bear stuffing I already had. Then I put it on my dummy and I was ready! The fabric is black stretch lace bought at etissus.com. I also bought the red chiffon for my next gown there. I must tell you about the excellent customer service of this e-shop which accepts returns and delivered me again extremely quickly after a mistake in the color, all that during Xmas holidays! Amazing! For the crossed neckline, the corset, the wrists and the belt below the breasts I used a ribbon of stretch lace found at my local fabric store, Les Tissus du Renard, where I also found the black satin ribbon of the lacing and the bias & little black cord used to create the corset.

Pour la confection j’ai improvisé directement sur le mannequin. J’ai utilisé un vieux t-shirt comme base du haut de la robe. Et pour la partie jupe j’avais vu la forme que devait avoir l’empiècement à plat pour bien tomber une fois assemblé. Donc après de savants calculs j’ai coupé directement dans le tissu après avoir placé quelques repères. J’ai assemblé les pièces en faisant des coutures anglaises pour plus de propreté et de solidité. Je suis partie sur un laçage sur toute la longueur du dos car Aurélie m’a demandé une robe qui aille à toutes les morphologies, c’était là la plus grande difficulté du projet et qui a généré beaucoup de brainstorming avec moi-même! Ha ha! Donc après avoir assemblé le corsage, les manches et la jupe j’ai rajouté un ruban sous la poitrine à nouer dans le dos pour bien marquer la séparation entre le gros bidon & les seins. J’aime beaucoup l’effet « double nœud » dans le dos qui crée un effet cintré que l’on a pas forcément à 8 mois de grossesse…n’est ce pas mesdames?! Enfin j’ai improvisé une couronne avec les chutes de dentelle en nouant des petits rectangles autour d’un fil de fer. J’ai tout recoupé très très court car au départ j’avais l’impression d’avoir une couronne d’algues sur la tête…

For the pattern, I improvised directly on my pregnant dummy. I used an old tee-shirt as a pattern for the bodice of the gown. For the skirt I had saw the shape it was supposed to have flat on my table to fall perfectly once sewn on the bodice. So after some clever calculations I cut right into the fabric following the markers I had placed. Then I stiched everything together with French seams for neat & solid seams. I put a lacing on the whole back as Aurélie had asked me for a gown that fitted most bodies, this was the main difficulty of the whole projet and it generated a lot of brainstorming with myself! Ha ha! Finally I added a stretch lace ribbon to knot in the back to really mark the separation between the breasts and the belly. I actually like the « double knot » effect in the back which created a more fitted look which is someting 8 months pregnant women are not used to anymore… am I right ladies? Finally I improvised a crown/headband with the lace scraps by knotting little pieces of fabric around a wire. I cut it very short because at first it looked like I had some seaweed on my head…

Et voilà! Ma robe « Noir c’est Noir » est terminée et envoyée! Je suis ultra contente du résultat! J’ai réussi à me rapprocher au maximum de mon croquis de départ qui avait tant plu à Aurélie. Ce qui est génial en couture, c’est quand on se lance vers l’inconnu et qu’on y arrive, ça ouvre des nouvelles possibilités de créations qu’on aurait jamais soupçonnées. Et moi, ça, ça me remplit de joie. Alors…

MERCI Aurélie pour ta confiance et ta carte blanche!

MERCI Mag de m’avoir mise en relation avec Aurélie & d’avoir vanté mes talents 😉

MERCI à mon mari de supporter ma passion et de toujours m’encourager…

MERCI à mon frère Clément pour ses sublimes photos (encore une corde à ton arc!)

MERCI à ma mère pour avoir été mon assistante styliste pendant le shooting 🙂

& MERCI à mes filles pour me dire tous les jours que je suis la meilleure en championnat de couture et que ce que je fais « c’est beaaauuuu mamaaaan »!

J’ai TROP hâte de voir les sublimes futures photos d’Aurélie avec des vraies mamans enceintes dedans! 😉

IMG_7064

So ta daaaaa!!! My « Black is Black » gown is finished and shipped! I am beyond happy with the final result. I managed to stay very close to my first sketch that Aurélie liked so much. The most amazing thing with sewing is that when you go for the unknown and you succeed, it opens new creative possibilities that you would never have imagined possible. And this just fills me with joy. So…

THANKS Aurélie for your trust and carte blanche!

THANKS Mag for introducing me to Aurélie and for promoting my sewing talent 😉

THANKS to my sweet husband for making with my passion and always cheering for me…

THANKS to my brother Clément for his gorgeous shots (another of your many talents!)

THANKS to my mom for being my wardrobe assistant during the shoot 🙂

& THANKS to my girls for telling me everyday that I am the best in sewing championship and that what I do is « sooooo beautifuuuuul »!

I CAN’T WAIT to see the beautiful pictures Aurélie will shoot of real pregnant mommies in it! 😉


Paniers en tissu & simili cuir!

DSC_2307

Deux petits paniers ou vides-poches pour dépanner le Père Noël cette année! Je cherchais des petites choses jolies, simples et utiles à faire et après être partie sur des trousses j’ai changé d’avis tout d’abord parce que le zip (même si au final il est facile à poser) me repousse toujours et surtout car je suis tombée sur ce tuto super mignon et facile de Christina McKinney trouvé sur le site de Birch Fabrics. Alors il y a trois modèles: Small, Medium & Large. J’ai réalisé la plus grande taille.

DSC_2297

Two little baskets or bins to help Santa this year! I was looking for cute, simple and useful things to make and after thinking first to make zipped cases, I changed my mind because I always prefer a zipper free sewing (even though at the end the zipper is always easy to sew but you know… I can’t explain why!) and mostly because I found this amazingly cute & easy tutorial by Christina McKinney on Birch Fabrics website. There are three sizes available: Small, Medium & Large. I chose to make the largest size.

DSC_2296

Pour le premier j’ai utilisé un coupon de simili zèbre et un de coton noir étoilé blanc qu’il me restait de mon sac Romy. Pour le second j’ai utilisé un coupon de simili cuir python/croco blanc acheté chez Ki Sign (sur le salon Creativa de Nantes) et un coupon coton avec triangles multicolores qu’il me restait de mes coussins à pompons. Le blanc fait plus grand que le zèbre alors que j’ai fait la même taille! Certainement parce que le simili python/croco est beaucoup plus rigide que le zèbre qui lui est très souple. Bref c’est la première fois que je couds des paniers en tissu et j’ai lutté pour ne pas les garder pour chez moi!!! Ha ha! Heureusement il me reste quelques coupons de simili de chez Ki Sign pour en refaire… 😉

For the first one I used a coupon of zebra synthetic leather and black cotton with white stars I had left from my Romy Bag. For the second one I used a coupon of white python/crocodile synthetic leather bought at Ki Sign (At the Creativa fair in Nantes) matched with a coupon of multicoloured triangles cotton I had left from my daughter’s Pompom cushions. The white one looks bigger than the zebra one certainly because the python/crocodile synthetic leather is very stiff compared to the zebra one which is very soft. Anyway, it was my first fabric bins and I almost kept them for myself!!! Ha ha! Thankfully I have some synthetic leather from Ki Sign left so it won’t be long until I make some again for myself… 😉

DSC_2301


Teddys Père/Fils pour Noël!

DSC_2330

Mes teddys c’était THE projet couture de Noël. Comme d’hab je n’avais pas du tout prévu de faire ça mais l’idée finale est apparue dans ma tête presqu’un mois avant donc j’étais laaaaarge! (Même si j’étais toujours sur le dossier le matin du 24!!!). J’étais partie pour faire quelque chose pour mon père et pour mon frère sur la base du sweat fait pour mon mari il y a peu. Ma mère m’ayant dit d’éviter la capuche pour mon père, et comme je voulais faire vraiment deux pièces identiques, j’ai cherché pour faire quelque chose d’original qui ne ferait pas trop « gilet » (surtout pour mon frère) et puis un jour j’ai eu un flash (oui ça m’arrive souvent…): Un teddy! Evidemment…

DSC_2320

My varisty jackets were THE sewing project for this XMas. As usual I hadn’t planned this at all in the first place but the final idea appeared clearly in my mind almost one month before Xmas Eve so I had waaaaay enough time to do it! (even though I was still working on it on the morning of the 24th!!!). I wanted to make something for my dad and brother on the basis of the hoodie I made for my husband a little while ago. My mom having told me to avoid making a hoodie for my dad, I looked for something original that did not look too much like a « vest » (especially for my brother) and then, one day, I had a flash (yes it happens to me sometimes…): A varsity jacket! Of course…

Pour le patron je suis donc partie du McCall’s 6614 utilisé pour le hoodie de mon mari en enlevant la capuche. En effet pour faire un teddy avec manches contrastées il fallait un modèle avec manches raglans. Je n’ai pas mis les poches car pour faire vraiment teddy il fallait des poches passepoilées! Aïe j’en avais jamais faites!!! Et c’est là que le tuto des filoutes m’a sauvée!  Après avoir visionné 2/3 vidéos je n’avais toujours rien compris et ce tuto est vraiment limpide! Encore merci Filoute! Et en effet le rendu est top! Ca fait vraiment des finitions super soignées.

J’ai utilisé du sweat marine avec envers Minkee trouvé aux Tissus Myrtille de Cholet (toujours le même que pour le sweat de mon mari). Donc super douillet! Également du sweat blanc gratté trouvé chez Vêtement Marin Broderie et du bord-côte rayé marine et blanc trouvé chez Ma Petite Mercerie. Vous remarquerez que l’envers des poignets, du col & de la ceinture sont blancs car j’avais (évidemment) mal calculé le métrage du bord-côte…

For the pattern, my basis was the McCall’s 6614 hoodie I made for my husband except I took off the hood. To make a varsity jacket you need a model like this with raglan sleeves. I also took off the pockets of the model because what is a varsity jacket without piped pockets?! I’m asking you! Crap I had never done these before!!! But the Filoutes’ tutorial saved me! I had already watched a couple of videos and I still could not figure out how to make those pockets and then I watched this tutorial and everything became crystal clear! The pockets look amazingly & surprisingly very professionally done & super neat!

I used navy sweatshirt fleece with minkee on the other side, found at Tissus Myrtille in Cholet (the same I used to make my hubby’s hoodie). very Comfy! Also some white brushed sweatshirt fleece bought at Vêtements Marins Broderie and striped navy/white ribbing found at Ma Petite Mercerie. You will notice that the inside of the cuffs, collar & waistband are white as I miscalulated what I needed when I ordered the ribbing…

DSC_2335

Pour les tailles j’ai fait un M pour mon frère mais ça taille quand même grand (même celui de mon mari est large) et pour mon père (XXL) j’ai du improviser car McCall’s vend ses patrons en 2 groupes de taille: S/M/L ou XL/XXL/3XL et j’avais acheté le 1er… Je n’avais aucune envie de repayer un patron donc j’ai décidé d’improviser en me basant sur un gilet de mon père. Et en fait toutes les mesures étaient identiques au M sauf le tour de taille (he he… bah oui il fait pas XXL pour rien) donc  j’ai rajouté 10 cm devant et 10cm derrière. Le résultat m’a bien fait flipper au départ car je me suis retrouvée avec une encolure géante! J’ai du coup repris pas mal de centimètres aux coutures manche/devant & manche/dos pour resserrer l’encolure au maximum & ça a marché en partie parce que les manches étaient bien larges. J’ai quand même du pas mal tirer sur le bord-côte pour avoir un col correct…

DSC_2334

For the sizes I made an M for my brother but it sizes quite large (my husband’s hoodie is large for an M) and for my father (XXL) I had to improvise because McCall’s sells its patterns in two groups of sizes: S/M/L or XL/XXL/3XL and I had purchased the first one… I had no intention of making a second purchase of the same pattern so I decided to improvise with a vest of my dad as a guideline. All measurements were pretty much identical to the M except the waist (he he… he is indeed a size XXL!) so I added 10cm on the front and 10cm on the back pieces. The result almost freaked me out as the neckling became huuuuge! So I took off some centimeters at the sleeve/front & sleeve/back seams to tighten the neckline back up and it worked parlty because the sleeves were quite wide. Finally I had to pull a lot on the ribbing to end up with a correct collar…

IMG_6334

Et voilà! 2 teddys personnalisés Junior/Senior au pied du sapin! Personnalisation avec du flex effet flocage blanc découpé avec ma Silhouette Portrait. Au final mon frère nage dans le sien et celui de mon père lui va super! Sinon cliquez ici pour connaître l’histoire de la veste Teddy dans un petit article en français!

And ta daa! 2 personalized varsity jackets Junior/Senior underneath the Christmas Tree! Personalization with white flock flex cut with my Silhouette Portrait. At the end my brother’s is too big and my dad’s fits perfectly! Click here if you wanna learn more about the history of the famous Varsity Jacket in an article in English!

DSC_2380

Sweat zippé Tanchet/Teahupoo

DSC_1925

Couture #2 pour l’homme de la maison! « Moui…je voudrais bien un sweat bleu marine… » m’a-t-il marmonné un jour quand je lui ai demandé ce qu’il voulait que je lui couse. Oui l’homme se plaint parfois d’être un peu le laissé pour compte de mes réalisations coutures… Un sweat bleu marine?! Easy me dis-je intérieurement… jusqu’à ce que je me mette en quête d’un patron de ce basique de la garde-robe de mon cher et tendre: le sweat on ne peut plus basique zippé à capuche, et là… rien! Impossible de trouver LE patron… Soit la coupe n’allait pas, soit pas de zip, soit pas de capuche… c’est clair que l’offre de patrons sportswear pour hommes est proche du néant! Avis aux maisons de patrons indépendants! On veut des patrons pour faire des fringues à nos presque-quarantenaires qui veulent rester cools dans leurs futes Volcom! Help!

DSC_1937

Sewing #2 for the man of the house! « well… I’d like a navy blue hoodie… » he mumbled one day after I asked him what he would like me to sew for him. Yes the man oftens complains to be left aside when it comes to my sewing… A navy hoodie?! Easy I told myself… until I started looking for the pattern of this classic piece of my husband’s wardrobe: the zipped hoodie, and… nothing! I could not find THE pattern… the cut wasn’t quite right, or it was missing the hood, or the zipper… The reality of the sportswear patterns for men is bad! I’m calling out the independent patterns houses here! We need patterns for our almost-40 year olds who still want to look cool in their Volcom trousers! Help!

Et puis je suis tombée sur le patron McCall’s 6614! Yes! C’est exactement celui que je cherchais! Coupe simple, capuche, zip et poches plaquées. Nickel! Petit bémol des patrons McCall’s multi-modèles (le 6614 en propose 4 différents) c’est qu’ils sont mélangés sur la planche et que les 17 pièces ne se superposent pas donc 61 pages à imprimer et scotcher… pour au final n’en utiliser même pas la moitié… Pour le modèle que j’ai fait seules 8 sur les 17 pièces étaient nécessaires… Ca commence à rajouter au coût de revient entre le papier, l’encre et le scotch! Lol!

And then I found this McCall’s 6614 pattern! Yes! It was exactly what I was looking for! Simple cut, hood, zipper & patch pockets. Perfect! Only drawback regarding the multimodels McCalls Patterns (#6614 proposes 4 different garments) is that all the models pieces are mixed on the pattern sheet and none of the 17 pieces cross each other so I had 61 pages to print & tape together… to only use half of it to make the model I chose… Indeed I only needed 8 of the 17 pieces. Paper, ink & tape are starting to add to the cost price of the garment! Lol.

DSC_1946

Pas de difficulté particulière à coudre ce sweat. J’aime beaucoup les détails du patron: manches raglans & pinces épaules. Le modèle tombe super bien. Seul hic: dans les fournitures McCalls précise qu’il faut une fermeture éclair de 60cm or il me manquait 10cm!!! J’ai dû aller l’échanger pour une de 70cm. Pourtant je n’ai fait qu’une taille M! Alors soit ils se sont trompés (ce qui m’étonnerait, ça aurait déjà été corrigé depuis le temps que le patron existe) ou soit j’ai buggé quelque part (plus probable!)… Le tissu je l’ai trouvé par hasard chez Tissus Myrtille à Cholet (49) qui propose ce superbe sweat avec envers minkee en plusieurs coloris dont ce joli bleu marine qui tire sur l’indigo. Par contre pas de bord-côte là-bas et miracle un rouleau de bord-côte du même coloris m’attendait aux Tissus du Renard

DSC_1948

This sweatshirt was quite easy to sew. I love the pattern details: the raglan sleeves & shoulder darts. The model falls perfectly. Only problem: McCalls indicates to use a 60cm zipper (24″) but I was missing 10cms (4″)!!! I had to swap it with a 70cm zipper (28″). And I only did a size M! So either they made a mistake (less likely because it would already be corrected since the pattern came out) or I did (more likely!)… I found the fabric by chance at Tissus Myrtille at Cholet (49) which proposes this lovely sweatshirt fabric with minkee fleece on the other side in different colors such as this lovely Navy/Indigo blue. But they did not have the matching ribbing! Fortunately and most surprisingly the perfectly matching ribbing was waiting for me at Les Tissus du Renard

DSC_1951

Pour la personnalisation, toujours pareil, il s’agit de flex flock blanc découpé avec ma Silhouette Portrait. Pour les connaisseuses le bon réglage de la lame pour le flock est la position 4. HappyFlex étant (toujours) en rupture de stock sur cet article j’ai commandé mon flex chez Créadhésif. La qualité est très bonne (en tout cas à l’application au fer car je n’ai pas encore relavé le sweat) malgré le fait que des petits résidus de flock blanc se déposent sur le vêtement autour de la pellicule transparente à décoller. J’ai du gratter le tissu pour les faire partir. Sinon rien à dire! En plus très pratique c’est vendu au mètre par 50cm de large donc on le reçoit en rouleau. Et puis il y a énormément de choix: flock, paillettes, PU, gonflé, phosphorescent, etc. J’ai proposé à l’homme (qui ne voulait rien écrire au départ) de marquer ces deux spots de surfs, Tanchet (celui où il a appris à surfer) & Teahupoo (celui où il aimerait bien retourner) et les motifs polynésiens qu’il a déjà mis sur une de ses planches: Raie Manta/Tortue & Vahiné Hinano.

DSC_1926

To custom the sweatshirt, as usual, I used white flock flex cut with my Silhouette Portrait. For the experts, 4 is the ideal position of the blade to cut flock. HappyFlex being (still) out of stock of this item I ordered it at Créadhésif. The quality is very good (pressing it on with my iron, I haven’t washed it again with flock) in spite of some flock residu on the edges of the protection transparent plastic sheet when you remove it. I had to scratch it off. Other than that everything was just great! Oh and they sell it by the meter on a 50cm width so you receive it in a roll. And they have very wide & complete offer: flock, glitters, PU, puff, phosphorescent, etc. I proposed to the Man (who didn’t want to mark anything in the first place) to put those two surfing spots, Tanchet (the one where he learned) & Teahupoo (the one where he would like to return to) & the polynesian patterns he already put on one of his boards: Manta Ray/Turtle & Hinano Vahiné.

DSC_1940

Et voilà le surfeur a son sweat, il est heureux! Surtout qu’il vient d’aller récupérer sa nouvelle planche, une Guimbo 6’1 Made in France, je dirais même Made in Les Sables d’Olonne par Daddy Seal Surfboards. Mathieu Portero est un vrai artisan qui crée des planches uniques de qualité. N’hésitez pas à jeter un oeil à son site et à promouvoir nos talents locaux! L’homme en est déjà à sa seconde planches et à mon avis c’est pas terminé…

DSC_1941

The surfer has his sweatshirt, he’s happy! Also because he just picked up his new board, a Guimbo 6’1 Made in France, or should I say Made in Les Sables d’Olonne by Daddy Seal Surfboards. Mathieu Portero is a true craftsman who creates unique boards of great quality. Do not hesitate to check out his website and promote our local talents! The man already has 2 boards from Daddy Seal and I think it is just the beginning…

DSC_1942

Crédit photo: Me!


Confortable Marin

DSC_2682

Je ne vous dirai pas son âge parce que vous ne me croiriez pas… Aujourd’hui mon mannequin c’est ma Maman qui a fêté son anniversaire la semaine dernière et pour l’occasion je lui ai fait un petit sweat Confortable de chez MLM Patrons. Le modèle lui avait bien plu quand je lui avais montré celui fait précédemment pour ma copine Jennifer, notamment le col bateau très féminin. J’attendais donc que l’occasion se présente pour lui en faire un. J’avais commandé ce coupon de molleton gratté marin bien chaud chez The Sweet Mercerie et je trouve que le motif marin se marie à merveille avec le style du sweat.

I won’t tell you her age as you would not believe me… Today my model is my gorgeous Mom who celebrated her birthday last week, and for the occasion I made her a lovely Confortable Sweatshirt from MLM Patrons. She actually liked the model when I first made it for my friend Jennifer a little while ago, especially the lovely & very feminine boat neck. I was waiting for the occasion to make her one and so her birthday came up. I had this warm Marin Sweatshirt fabric from The Sweet Mercerie and I think it matches perfectly the style of the garment.

Alors ma maman est très menue, je suis donc partie sur la taille S du patron qui est proposé en 5 tailles du S au XXL. Malheureusement, comme vous pouvez le constater sur les photos faites en extérieur la taille S taillait encore trop grand! Afin de créer un XS j’ai procédé de la manière suivante: Sur le modèle cousu retourné sur l’envers j’ai commencé à couper à 1cm du bord du tissu (pas de la couture!) au poignet et élargissant pour atteindre 2 cm à l’emmanchure et en mourant vers le bas pour atteindre 1cm à l’ourlet du bas. On peut voir le réajustement sur la photo ci-dessous. Donc sur le modèle porté j’ai enlevé 2 cm de tour de poignet, 8cm de tour de poitrine et 4cm de tour de bassin. Je n’ai pas touché à l’encolure qui tombait nickel. Et donc le résultat se voit sur les photos en intérieur (le microclimat sablais m’a lâchée ce jour là!)

IMG_5496

My mom is very thin so I decided to make the size S of the pattern which exists in 5 sizes from S to XXL. Unfortunately, as you can see on the outdoors pictures the size S was still too big! In order to create a XS size I did the following: On the sewn garment wrong sides up I started cutting 1cm away from the edge of the fabric (not the stiching!) from the wrist widening as you go to reach 2cm at the armhole and then narrowing it down to the bottom to reach 1cm at the hem. You can see the modification I made on the above picture. So on the worn garment I took off 2cm around the wrist, 8cm around the chest and 4cm around the hips. I did not alter the neckline which was perfect already. You can see the final result of the pictures taken indoors (The microclimate from Les Sables let me down this time!)

DSC_2685

Le résultat est super beau je trouve et lui va vraiment bien! J’ai arrondi l’arrière du sweat car je ne sais pas comment j’ai fait mais je me suis retrouvée avec un dos plus long que le devant… Avec le Courcelles ce sweat fait partie des must-haves de ma patronthèque de sweatshirts! Je suggère juste à MLM Patrons de rajouter une taille XS pour les filles menues comme ma Maman 😉 Le sweat marin était un régal à coudre. Mes prochains projets sweats: Sweat zippé McCall’s 6614 pour mon cher et tendre et un Augusta de Named pour moi… Restez connectées!

DSC_2688

I just love the look! It suits her figure very well I think. I rounded the back bottom of the sweatshirt as I don’t how but I ended up with a back longer than the front… With the Courcelles, Le Confortable is a must-have in your sweatshirt pattern collection. I would only suggest to MLM Patrons to add a size XS for the very thin girls like my Mom 😉 The Marin fleece was a delight to sew. My next sweatshirt project: McCall’s 6614 zipped hoodie for the hubby and Named’s Augusta for me… stay tuned!

Crédit photo: Stan D & Le Gitan